Heroshi Maruchi Chopper

Maruchi Chopper

TROUBLESHOOTING

This versatile appliance excels in quick and efficient food preparation, allowing you to chop, mix, grind, mince, puree, blend, shred, slice, and more.

  • Use only 220-240V~50-60Hz power.
  • Use indoors only.
  • Avoid electrical shock – never immerse the motor or cord into liquid.
  • Always operate the chopper well away from water.
  • Maintain close supervision when the chopper is used near children.
  • Always disconnect chopper from power source when not in use and when assembling or disassembling.
  • Never touch or move any moving parts during operation.
  • Never open the chopper when it is operating.
  • Never place chopper on hot surfaces.
  • Always operate the chopper on a flat surface.
  • Never allow the cord to hang over table edge or bench top.
  • Never use chopper if damaged.
  • Only remove coaxial blades once chopper has completely stopped.
  • Handle blades with care -they are extremely sharp.
  • Remove blades before emptying bowl contents.
  • Never operate the chopper without a loaded bowl.
  • Always use care when cleaning.
  • Never operate chopper with a damaged cord or plug.
  • Never operate chopper if malfunction occurs.
  • Never operate chopper if it is dropped or damaged in any manner.
  • If the chopper labours (i.e. is not operating at its usual speed), remove some of the food from the bowl and continue by way of batch processing.
  • If the motor overheats it will turn off automatically. This built-in safety feature protects the motor from burn out. Always unplug the chopper and wait 10-15 minutes to allow motor to cool down in this event.
  • Where chopper does not work, ensure it is correctly plugged in and the power switched on.
  • Where shaking occurs during use, ensure the bowl, lid, and motor body are properly aligned and locked in place.
  • Never hold down button I or II (pulsing action) for longer than 15 seconds.

Ideas & Inspiration

Juicer recipes
Heroshi Saisho Juicer

Saisho Juicer

TROUBLESHOOTING

Unlike fast blenders that generate heat and compromise nutrition, the Heroshi Juicer gently crushes and breaks down cellular walls to release enzymes and nutrients for easy absorption.

    • Make sure the electricity supply is 220-240V.
    • This juicer is intended for household use only. Do not use the juicer outdoors or for other
      purposes.
    • Use the Heroshi juicer only as described in this manual.
    • To prevent electrical shock, do not immerse the juicer, cord set and plug into water. Operate the juicer at a safe distance from water.
    • This is not a toy and not to be used by children. Close supervision is required when the juicer is used near children.
    • Ensure to unplug the juicer when not in use, when assembling or disassembling, and before cleaning.
    • The continuous operation time limit for this juicer should be within 20 minutes.
    • Do not touch or move any moving parts during operation of the juicer.
    • Do not use finger, spoon or chopsticks to push fruits or vegetables in to the chute of the juicer. Only use the pusher provided.
    • Do not open the juicer when it is operating.
    • Do not place the juicer near any heated oven or hot surfaces.
    • Operate the Heroshi juicer on a flat surface.
    • Do not let the cord hang over the edge of the table or the bench top.
    • Please hold the plug to disconnect from the power socket.
    • If the parts of the juicer are found to be damaged (especially the power cord) please stop using it.
    • This product is not intended to be operated by persons (including children) with weak physical condition, slow reaction, mental retardation, lack of experience and common sense, unless they are under supervision or instruction by the person who is responsible for their safety.
    • If the screw press gets obstructed, put the juicer in ‘rev’ mode for about 2 to 3 seconds to let it turn in the opposite direction and loosen the blockage. After this, revert to using the product as usual.
    • Don’t use the water that is warmer than 65°C to rinse the appliance parts.
    • Make sure that the base of the juicer does not get wet.
 Trouble  Cause  Solutions
 The juicer stops running suddenly.  Too many ingredients put into the juicer  Switch to ‘R’ position instantly to make the ingredients return upwards. If the juicer still stops running, please clean the juicer before re-use.
 Hard fruits or vegetables have not been cut in small pieces.  Hard fruits and vegetables (such as carrot) should be cut into thin strips or small cubes before putting into chute.
 The juice yield is low or juice flows out of the main housing.  The Bowl and the silicone valve are not installed properly.  Please re-install the Bowl and silicone valve by referring to the installation method.
 Abnormal noise.  Parts cause extrusion sound during squeezing.  The sound is caused by extrusion of fruits and vegetables, which is normal phenomenon.
 The Chute and Strainer Assembly cannot be opened.  There is too much pulp inside the bowl.  Press switch to ‘R’ setting to eject the pulp backward.
 Hard foods stuck inside.  Press switch to ‘R’ to eject the object backward.
 The pulp mess is stuck.  Pour water into the Chute to soften the stuck pulp mess overnight.
 The container and accessories are dyed after use.  Dyed parts are due to natural colour of specific fruits/veggies.  This is natural color and unavoidable.

HINT: This Juicer is not suitable for juicing very hard or fibrous and starchy fruits or vegetables such as Sugar Cane. There are some fruits which contain too much starch to juice. They include avocado, bananas, figs, mango and papaya, dragon fruit, strawberry, and grapes without seeds. They will clog up the stainless-steel sieve.
Juicer assembly and cleaning

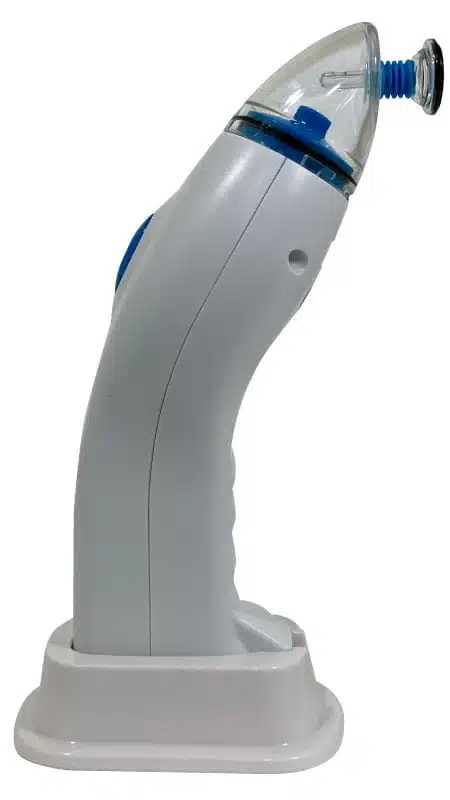
Jinsei unit side

Jinsei Vacuum Sealer

TROUBLESHOOTING

With our vacuum sealer, you can extend the lifespan of your food, reduce waste, and save money.

  • Use the Vacuum Sealer in short bursts, allowing a few seconds of rest between each burst. Please note that the Vacuum Sealer is not suitable for liquid food. For liquids, we recommend pre-freezing them into solids before vacuum sealing.
  • The vacuum bags are ideal for dry foods or cooked meals. For meats and fish, consider pre-packing them in a conventional freezer bag before vacuum sealing to achieve the best results.
  • To extend the life of the bags and minimize staining from food, wrap your food in cling wrap or another bag before vacuum sealing.
  • Avoid vacuum sealing foods with sharp bones, as they can puncture the bags.
    If sealing powdery substances like flour, be cautious as they may block the air valve and damage the bag.
  • When marking the bag with contents and date, always do so before adding foodstuffs.
    Allow 4-5 seconds after vacuum sealing is complete before removing the vacuum sealer from the bag or lid.
  • Before removing the sealer, press your finger down on the arrow on the air valve.
  • It’s essential to let your food cool before vacuum sealing to avoid damaging the bag or lid.
  • Remember not to microwave the bags or lid, and they are not dishwasher-safe.

 Problem

 Possible Cause

 Solution

 Vacuum Sealer does not start when ON Button is pressed.  Batteries have no power or are not properly installed.  Check batteries. Ensure batteries are installed with correct +/- position indicated on the Battery Cover. Install new batteries.
 Vacuum Sealer starts but bag does not tighten around food.  1. Bag is not completely closed. 2. Air Valve is not on flat surface. 3. Air Suction Tip and Air Valve not making secure contact. 4. Limited suction during vacumming. 5. Food is not arranged properly 6. Bag not fully sealed air tight.  1. Open Bag and reclose Zipper using sealing clip. Run fingers across entire Zipper to ensure it’s completely closed. 2. Reposition Bag so the Air Valve lies on flat counter, with no food under Air Valve. 3. Ensure Air Suction Tip is centered and placed flat on Air Valve. Apply moderate pressure. 4. Too much pressure is being applied on air valve. 5. Rearrange food so that it is below the Fill Line and is not under the Air Valve. 6. Allow several seconds for visible signs of bag tightening around food. Ensure Vacuum Sealer stays pressed on Air Valve continuously. Bag should tighten completely within 20 seconds.
 Vacuum Sealer starts but universal lid seal doesn’t under vacuum status.  The cover is not fitted properly. Or there is an obstruction in the silicone rubber.  Make sure the cover is properly fitted and no food is sitting on the silicone rubber.
 Vacuum Freezer Bag takes longer than 20 seconds to tighten around food, or loosens after air is removed. 1. Batteries are weak, Motor runs slowly. 2. Food particles are trapped in Zipper. 3. Zipper is not completely sealed. 4. Air Valve has not closed. 1. Install six new AA alkaline batteries. 2. Try another Bag if particles can not be removed. 3. Open Bag and reclose Zipper. Run fingers across entire Zipper to ensure it is completely closed. 4. Remove air from Bag again. Immediately press center of Air Valve with finger to ensure seal.

Discover Exiting World of Heroshi

Maruchi Chopper
Saisho Juicer
Jinsei Vacuum Sealer