Cold press technology

SAISHO JUICER
Kick start your new regime, boost your immunity and lose some of those extra kilograms. Heroshi is the best natural way to start your day.
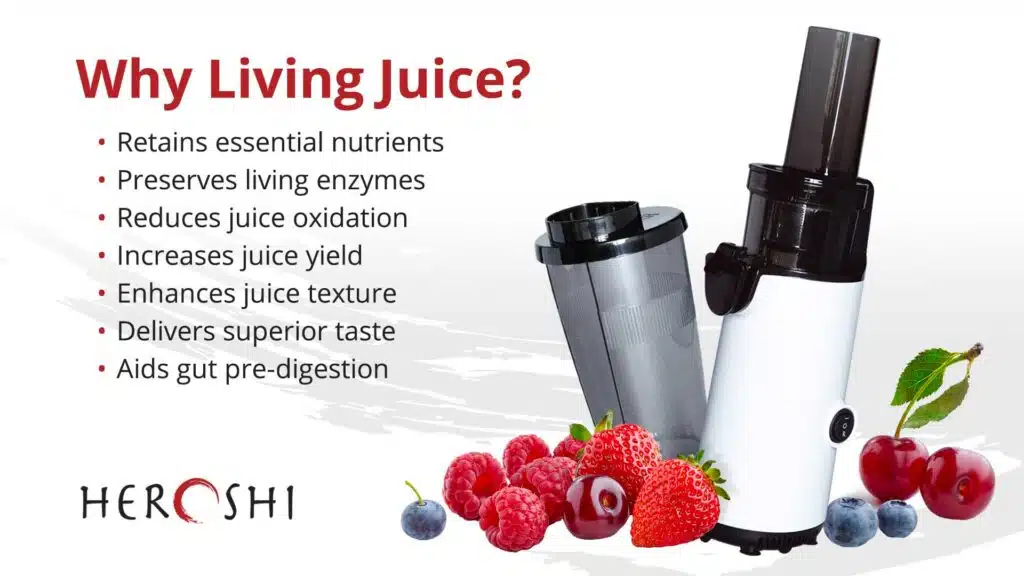
Heroshi Saisho Juicer, Why living juice?
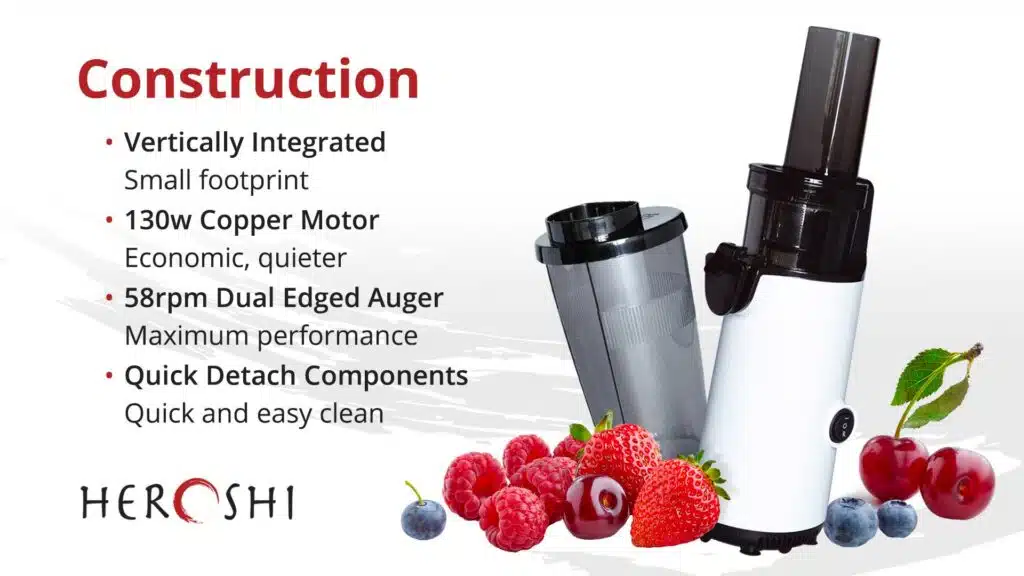
Heroshi Saisho Juicer, Compact construction

Elevate your well-being with Heroshi, the natural way to kick-start your day. The Heroshi Juicer, designed to meet Japan’s demand for fresh living juice, cold presses fruits and vegetables, preserving their vital nutrients. Unlike fast blenders that generate heat and compromise nutrition, the Heroshi Juicer gently crushes and breaks down cellular walls to release enzymes and nutrients for easy absorption. With its compact and vertical design, the Heroshi Saisho Juicer fits perfectly on your countertop. Enjoy quiet operation, transparent housing for monitoring, and convenient features like one-touch juicing, easy disassembly, and hand-washable parts. Embrace the benefits of freshly pressed juice with the Heroshi Saisho Juicer—your path to rejuvenation and vitality.

Ideas & Inspiration

JUICER RECIPES

Why Saisho?

COLD PRESS JUICING
Heroshi Saisho Juicer

The Heroshi Juicer retains all the goodness, all the soluble fibre and all the nutrients of the fruits and vegetables you are juicing. Fast blenders generate large amounts of heat and it is this heat that kills off beneficial nutrients. The Heroshi Juicer processes fruit and vegetables by gently crushing, breaking down the cellular walls, which release enzymes and nutrients, allowing your body to easily absorb them when ingested.

The Heroshi Juicer has been vertically engineered to provide a small footprint, so it is perfectly happy to sit on your bench top instead of in the cupboard.

  • Heroshi is much quieter compared to larger juicers.
  • See-through juicer housing to monitor the juicing process.
  • One touch forward and reverse function for trouble-free juicing.
  • Easily disassembles for ease of cleaning and storage.
  • Easy to clean: Hand wash, no dishwasher needed.
  • Safety lock.
  • Durable stainless steel juicing screen.
  • Stable operation: Secure suction feet
  • Avoid spills: Non-drip cover
  • BPA-free Tritan componentry

Technical details

Dimensions: 98mm x 120mm x 355mm

Weight: 1.58kg

Voltage: 220-240V – 50-60Hz

Motor: 130x copper motor.

Auger: 58rpm Dual edged auger

Juicing cup capacity: 600ml

Pulp container capacity: 450ml

Warranty: 5 years
Parts and assembly

PUTTING IT ALL TOGETHER
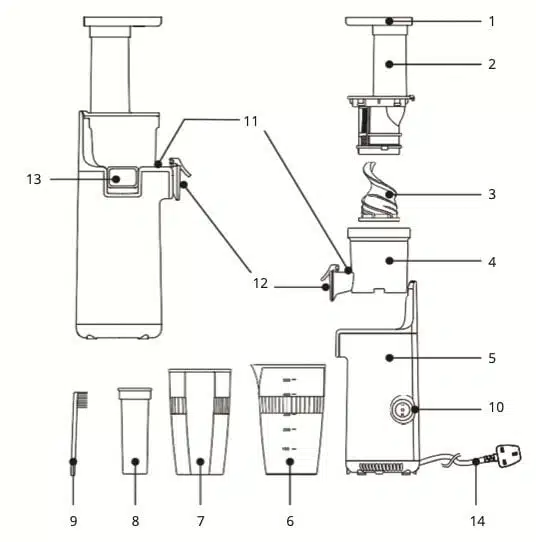
Heroshi Saisho Juicer parts diagram

Juicer parts guide

The juicer explained.
  1. Food Tray
  2. Chute and Strainer Assembly
  3. Squeezing Auger
  4. Juicing Bowl
  5. Power Base
  6. Juice Container
  7. Pulp Container
  8. Pusher
  9. Cleaning Brush
  10. On / Off / Reverse Switch
  11. Juice Spout
  12. Drip-stop cover
  13. Pulp Spout
  14. Power Cord
Heroshi Saisho Juicer

Juicer assembly

Note that the juicer has an in-built safety mechanism which will prevent operation unless the clip is locked in place.

Make sure the juicer is not plugged in and the switch is turned to ‘O’ setting before assembling.
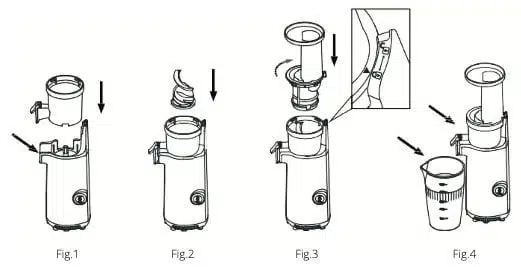
  1. Position the squeezing bowl on the Power base, align the position of the spouts and the axle. (Fig. 1)
  2. Push the squeezing auger firmly into the centre of the bowl, making sure that it touches down the bottom, or else the cover cannot be closed. (Fig. 2)
  3. Position the chute on the bowl to align the 5 to the and twist it clockwise until it clicks the safety lock. Please make sure that the arrow 5 on the cover aligns with the Lock graphic on the Bowl. (Fig. 3)
  4. Place the juice container and the pulp container under the relevant spouts. (Fig. 4)
Heroshi Saisho Juicer assembly

How to use, tips and troubleshooting

LETS GET JUICING

Introducing the Personal Juicer by Heroshi, a juicer that combines the timeless tradition of cold-press juicing with modern masticating techniques. No blending is required. The secret lies in the auger technology, which enables heat-free juicing.

Important

Get the most from your juicer.
Please do not use the juicer continuously for longer than 20 minutes.

If the juicer gets overheated, it will turn off automatically to protect the juicer. In this case, please turn the juicer off ‘O’ then wait 10 minutes to let the juicer cool down and then turn it on again.

The juicer is not suitable for juicing very hard or fibrous and starchy fruits or vegetables such as sugar cane. There are some fruits which contain too much starch to juice. Some examples are avocado, bananas, figs, mango, papaya, dragon fruit, strawberry, grapes without seeds etc. They will clog up the stainless-steel sieve.

Juicer usage guide

Get the most from your juicer.
  1. Connect the juicer with power.
  2. Check and make sure all parts are well assembled and firmly in their correct position.
  3. Make sure the juicer is at off ‘O’ position.
  4. Make sure the juice and pulp containers are in position.
  5. Make sure the juice spout cover is closed.
  6. Prepare fruits or vegetables and cut them into pieces max 2cm x 5cm strips or 2cm x 2cm cubes.
  7. Feed fruit into the chute.
  8. Press the switch to Setting ‘ – ‘ to start the juicing operation.
  9. Push the food down with the pusher only.
  10. In case of food stuck inside the Bowl, please switch to “R” reverse function instantly.

To avoid hazard of electric shock, unplug the juicer from power outlet when not in use or before cleaning.

Juicer tips

Tips and tricks.
  • Remove hard pits or seeds prior to pressing to prevent damage to the squeezing screw.
  • If making mixed juices, please begin with harder fruit, and then squeeze the soft fruit.
  • Let the juicer run for 30 seconds after the last ingredient was fed.
  • Not for Ice cubes, the ice cube is too hard. It may damage the squeezing parts.
  • Ingredients with long fibre need to be cut to 2-5cm thin strips or 2 x 2cm cubes as long fibre food may block the spout.
  • The peel, pips and seeds must be removed from oranges, lemons, grapefruit and melons before use. The hard pit or seeds may damage the squeezing parts. The peel may block the spout of pulp.
  • Do not use other implements as a pusher, it may damage the juicer and cause injury.
  • Each juicing cycle no longer than 20 mins. Using the juicer beyond 20 minutes may cause damage to the motor.
  • Never put spoons or chopsticks in the Chute opening, the juice and pulp spouts as it may damage the juicer.

Keeping it clean

JUICER CLEANING & MAINTENANCE
Heroshi Saisho Juicer parts diagram

Juicer diss-assembly

Taking the juicer apart.

To disassemble the juicer after using and before cleaning. Please turn the juicer to ‘O’ position and disconnect the juicer from power source then follow the steps below:

  1. Remove the Juice and Pulp containers. (Fig. 6)
  2. Remove the Chute. Turn the chute anti-clockwise until the 5aligns with the sign. (Fig. 7)
  3. Remove the Squeezing Auger by pulling it out upward. If it is very hard, swing gently and pull. (Fig. 8)
  4. Remove the Squeezing Bowl by lifting it upward vertically. (Fig. 9)

Juicer cleaning

Cleaning tips.

1. Switch off and unplug the juicer.

2. Wash the disassembled parts (Fig 10 below) with water. If the meshes are clogged with pulp, please use the cleaning brush provided to remove the dregs.

  • Do not use an iron wire brush, abrasive or sharp tool to clean the juicer.
  • Please do not use water above 40°C.
  • Never clean any parts in dishwasher to avoid damage by hot water.
Juicer cleaning 2

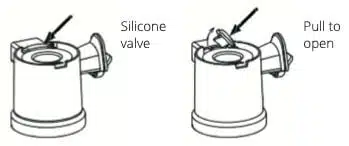
3. In case there is any residue remaining in the mouth of the pulp spout, please pull out the silicone valve as shown in (Fig 11 below) and clean under running water. Press the silicone valve to close it properly and tightly after cleaning.
Juicer cleaning 3

4. To Clean the seal ring in the centre of the squeezing bowl, please follow the steps as below:
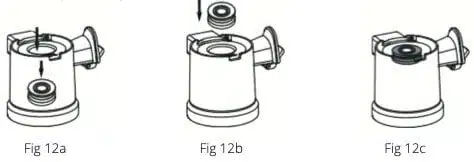
  • Turn the Squeezing Bowl upside down for easier handling, Push the seal ring out with your thumb (Fig 12a) and clean it with water.
  • After Cleaning, please put it back to the centre hole. The small ribbed surface should be facing upward (Fig.12b) Make sure the groove of the seal ring fits well in the squeezing bowl.
  • The big flat side of the seal ring will be inside while the small and ribbed side is outside the Squeezing Bowl. (Fig 12c).
Juicer cleaning 4

6. After cleaning, please dry the parts thoroughly and store them in a dry, cool place.

5. Do not put the Power Base into water for cleaning. Wipe it with damp cloth only.

Backg family

Juicer storage

Ready when you are.

Follow cleaning instructions to well maintain the juicer before storage.

  1. Tidy up the power cord set.
  2. Store the juicer away from easy access by children.
  3. Store the juicer and the accessories at a dry, cool place.

Please make sure the juicer and parts are dry before storage.

Discover the Exiting World of Heroshi

Maruchi Chopper
Saisho Juicer
Jinsei Vacuum Sealer